ON THIS PAGE YOU WILL FIND ANSWERS TO YOUR QUESTIONS
By clicking on the icons on this page you will find more frequently asked questions and the corresponding answers. If you have further questions, we can also be reached by e-mail and telephone and will be happy to help you.
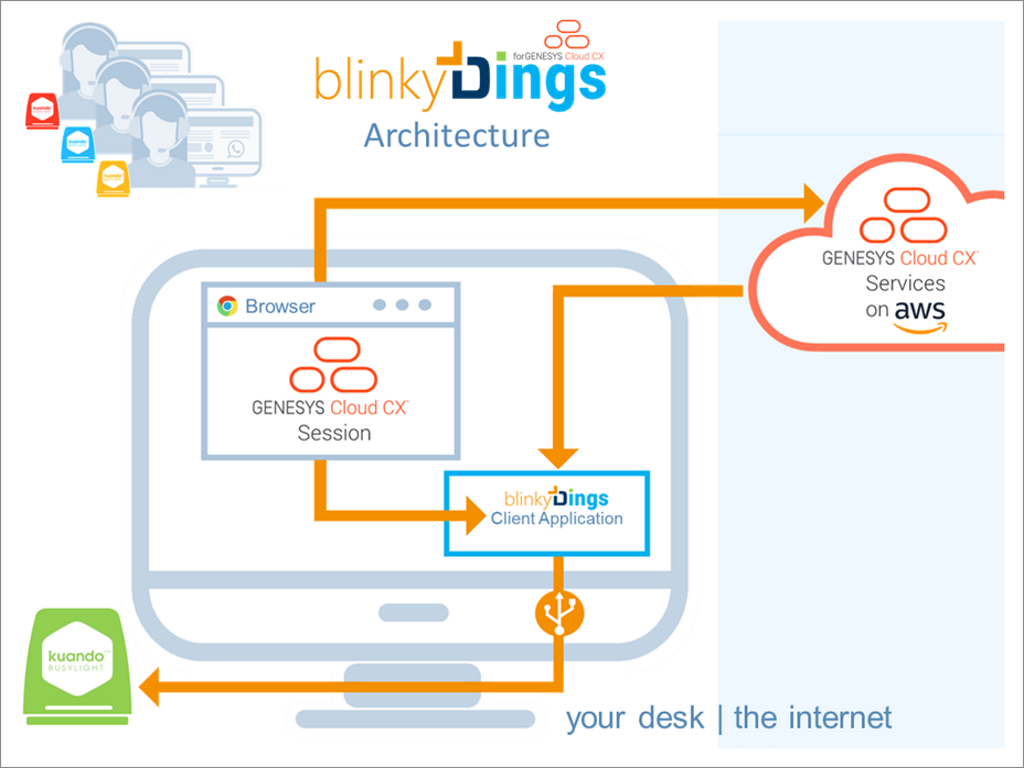
blinkyDings is a client application that extends the notification capabilities of Genesys Cloud CX, it provides signaling for each agent presence status, interactions status and routing status. These visual popups appear on the screen above all windows, that is, even if the particular browser initiating the notification is running in the background.
Thus, blinkyDings can be used to make it possible to see what is happening in the browser outside the browser on the screen or via the additional hardware.
- Here, you find the Install Guide for your reference.
- The associated Google Chrome Extension addon is installed and activated.
The name of this extension is “blinkyDings Genesys Cloud Connector”. - A user has at least one Genesys Communicate license.
- The user is logged in to the Genesys Cloud
- The user has an account for blinkyDings and is logged in there
Operating systems
- Windows 11 to Windows 7
Supported web browsers
- Google Chrome
- Microsoft Edge
Supported platforms
- Genesys Cloud CX
Currently only English is supported (German in planning).
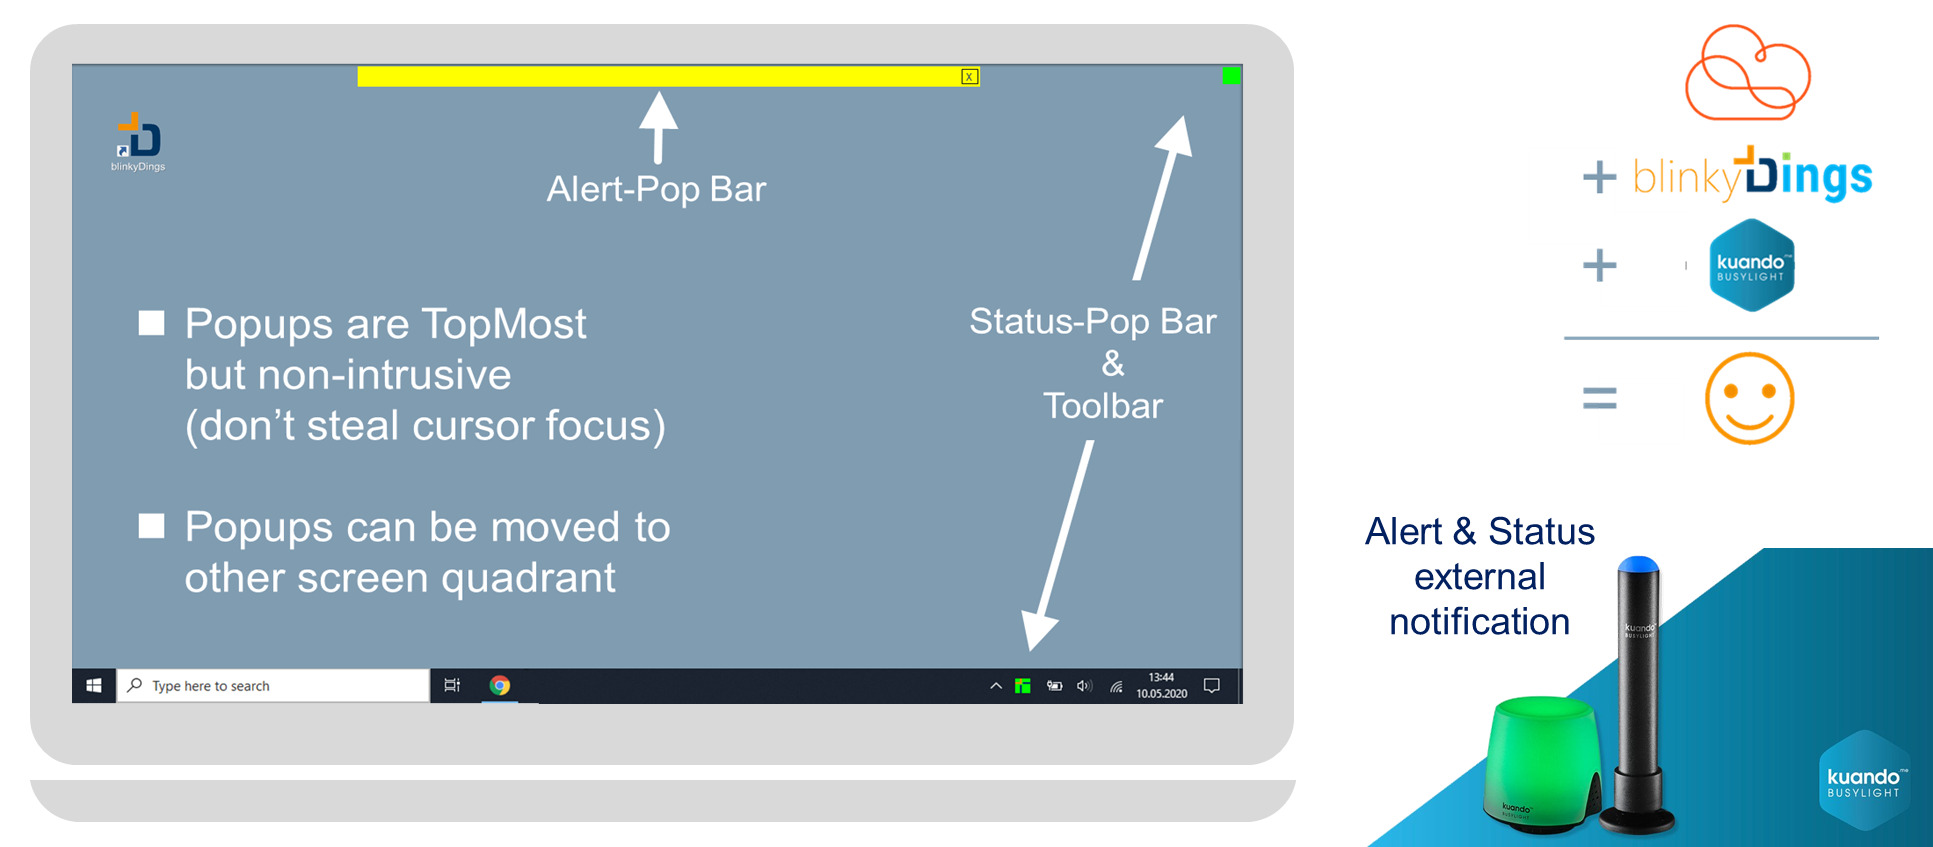
The following diagram shows how the status information can be signaled...
click image to enlarge
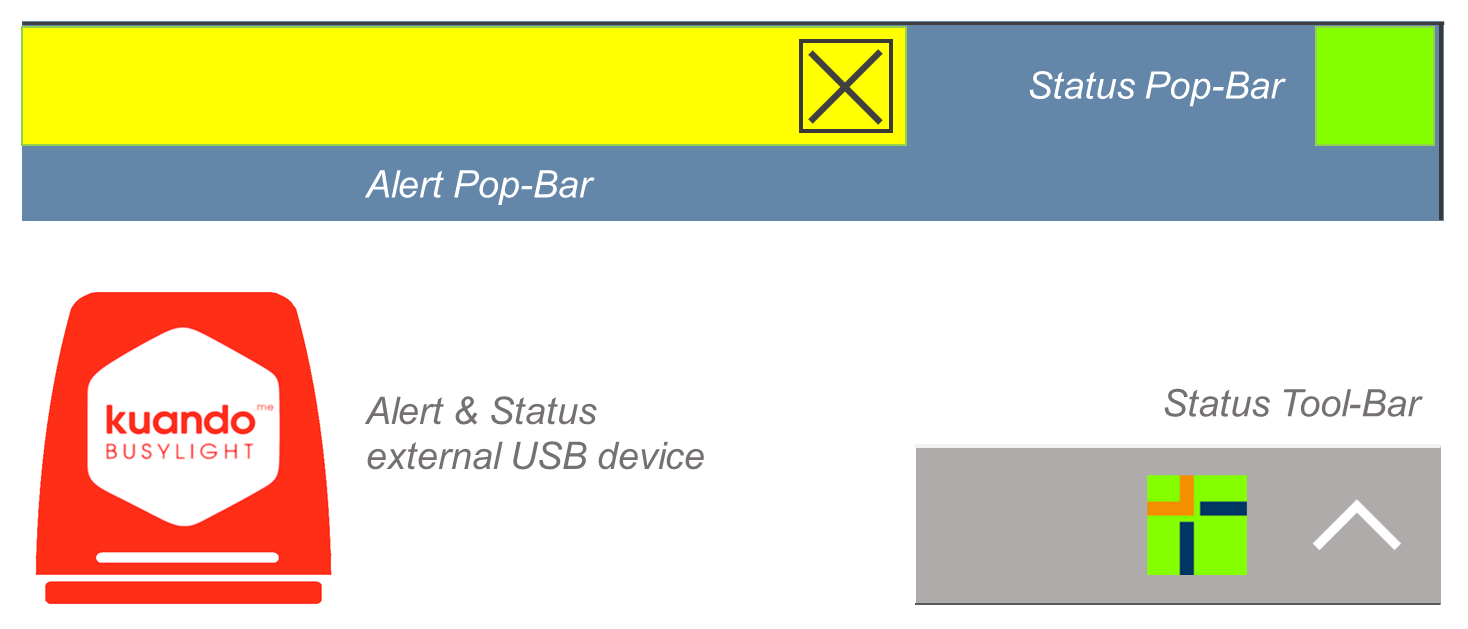
Status information is displayed via ALERT-POP-BAR, STATUS-POP-BAR and STATUS-TOOL-BAR, as well as on the optionally connected USB device.
- Popups are "TopMost" but not intrusive (cursor focus is not taken over)
- Popups can be moved to other areas of the screen
click image to enlarge
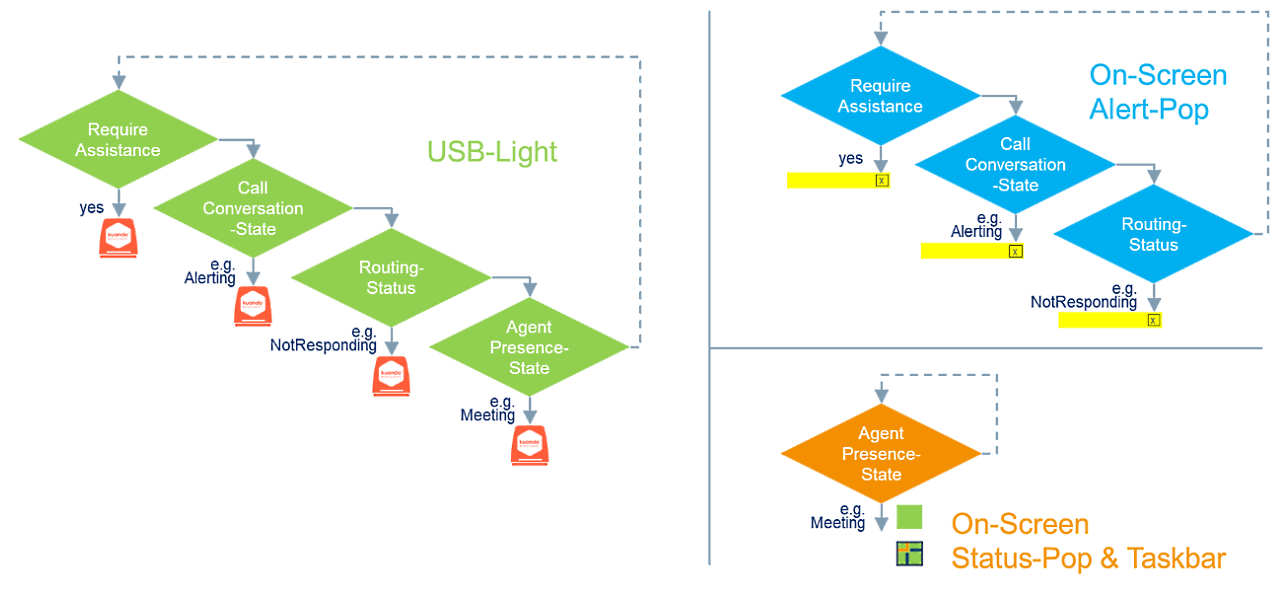
The following statuses can be displayed,
e.g. for incoming interactions:
- Request assistance
- Alert
- Interaction offered
- Connection established
- Connected
- Calling
- Not answering
- Disconnected
- Terminated
The following presence statuses can be displayed (approximately as in Genesys Cloud):
- (User defined states)
- Busy
- Meeting
- Available
- Idle
- Queued
- Training
- Offline
- Absent
- Break
- Lunch
After-Call-Work
Yes, there are - see chart....
click image to enlarge
1. Installation process via the Genesys App-Wizard
- Login mypurecloud.com assign the permission
[ "integration:blinkyDingsAdmin:view" ] - the browser must be reloaded to display the blinkyDings App-Wizard
- download blinkyDings Setup via Genesys Cloud CX blinkyDings App-Wizard
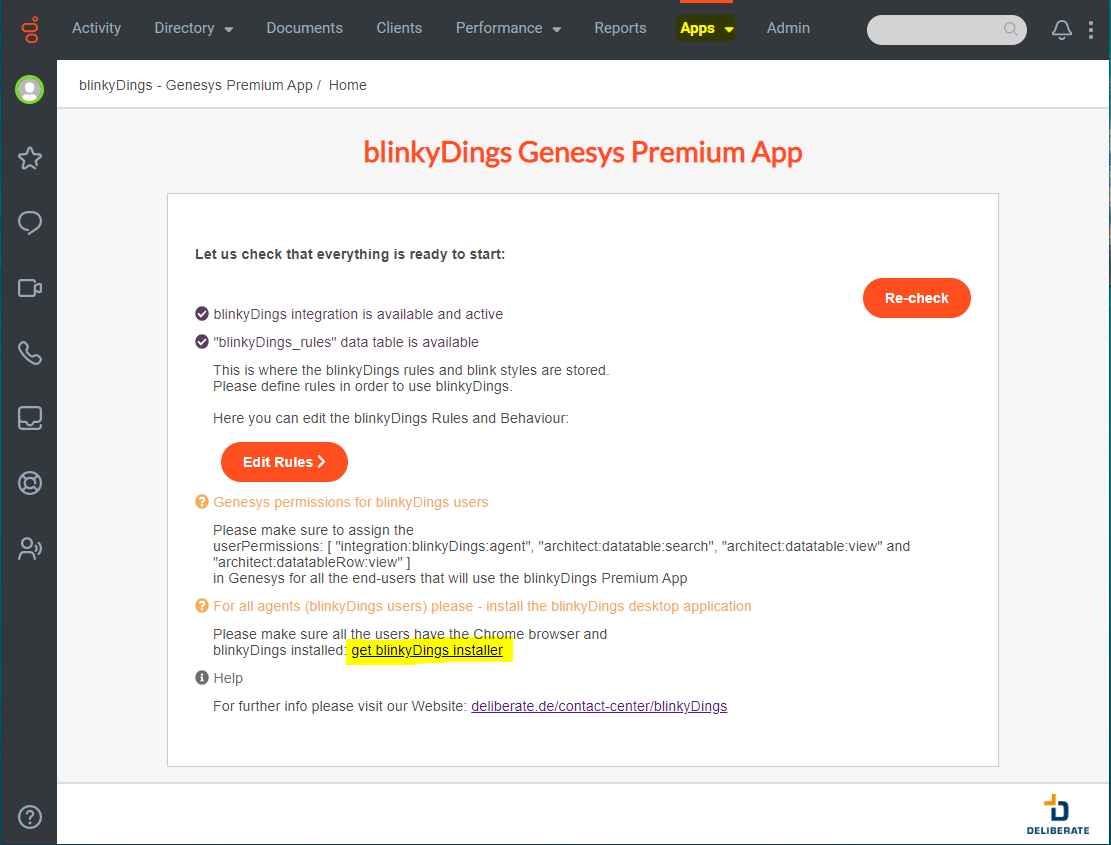
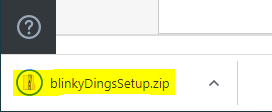
- Open ZIP-file
- Run the setup.msi
- If you want to install for all users in AutoStart (admin rights required)
- new screenshot returns Chris when finished
- The agents must be assigned the required permissions (see also GenesysAppWizard).
[ "integration:blinkyDings:agent", "architect:datatable:search", "architect:datatable:view" and "architect:datatableRow:view" ]
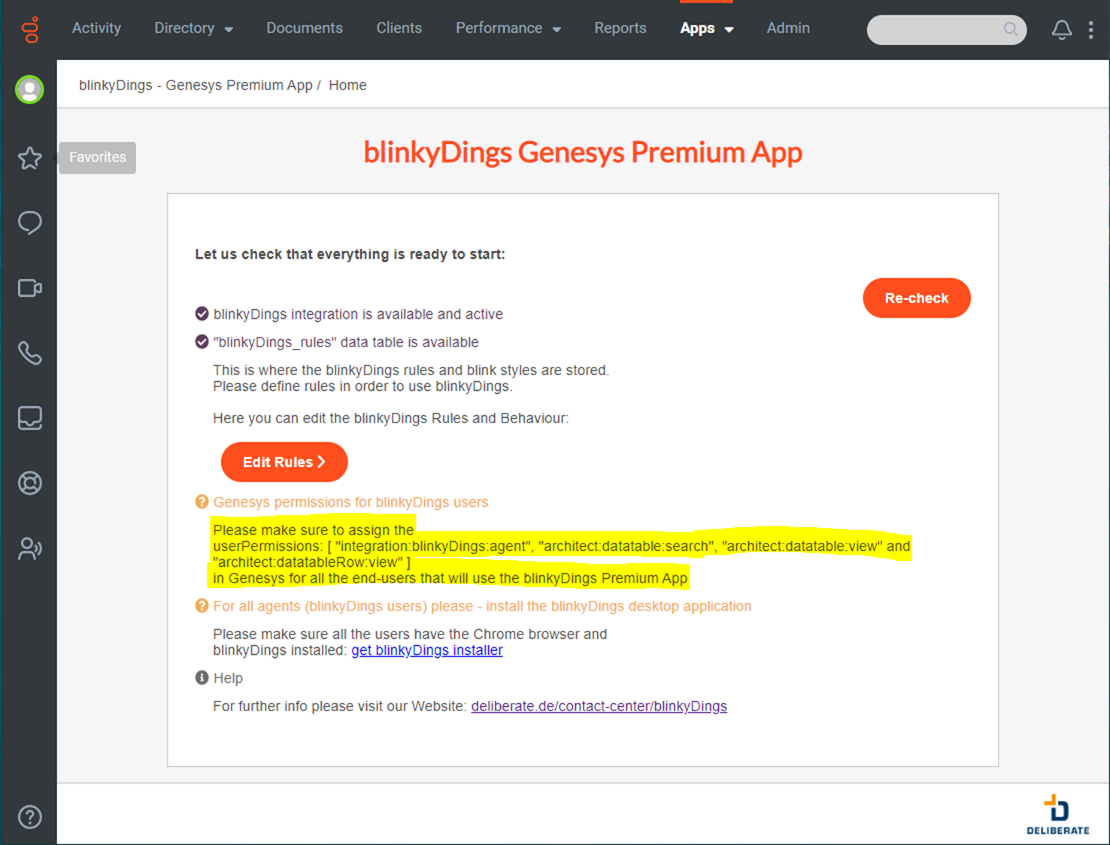
- The blinking behavior and rules can be configured via the Genesys AppWizard (login and permissions required)
2. Installation process via the Genesys AppFoundry.
- Call appfoundry.genesys.com blinkyDings and click configure
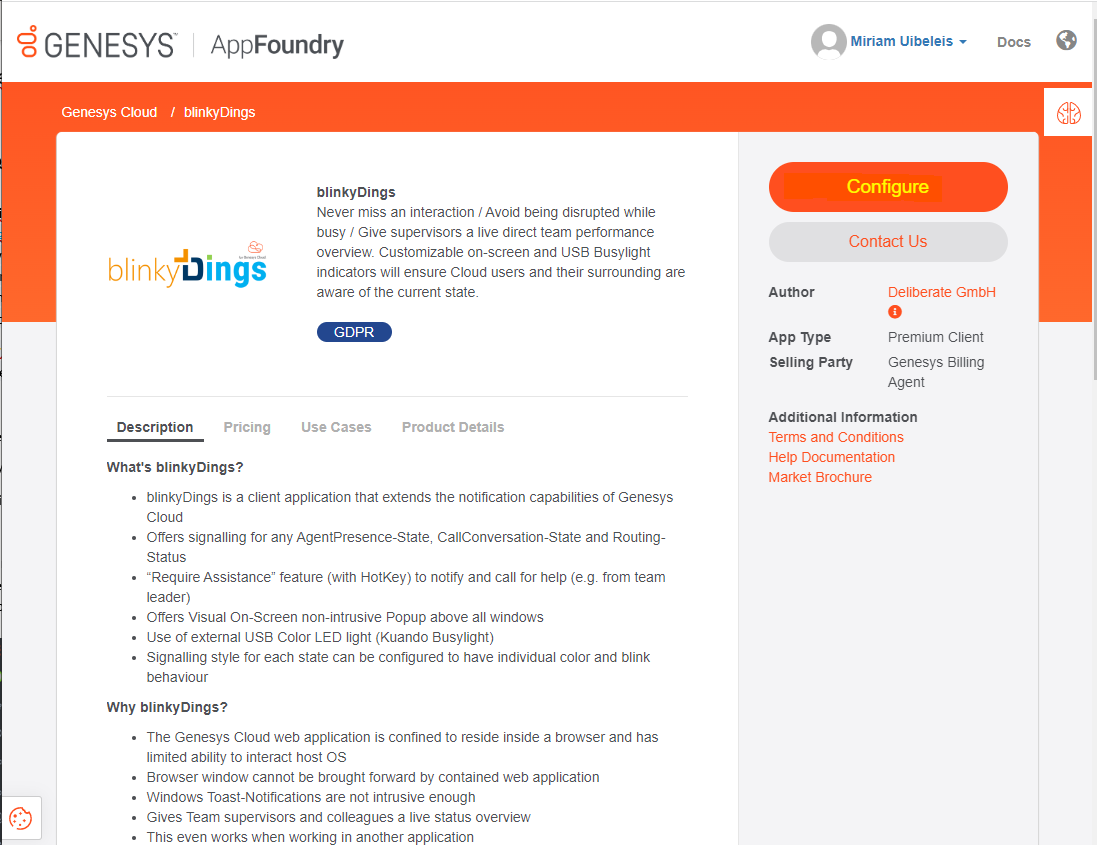
- click Next
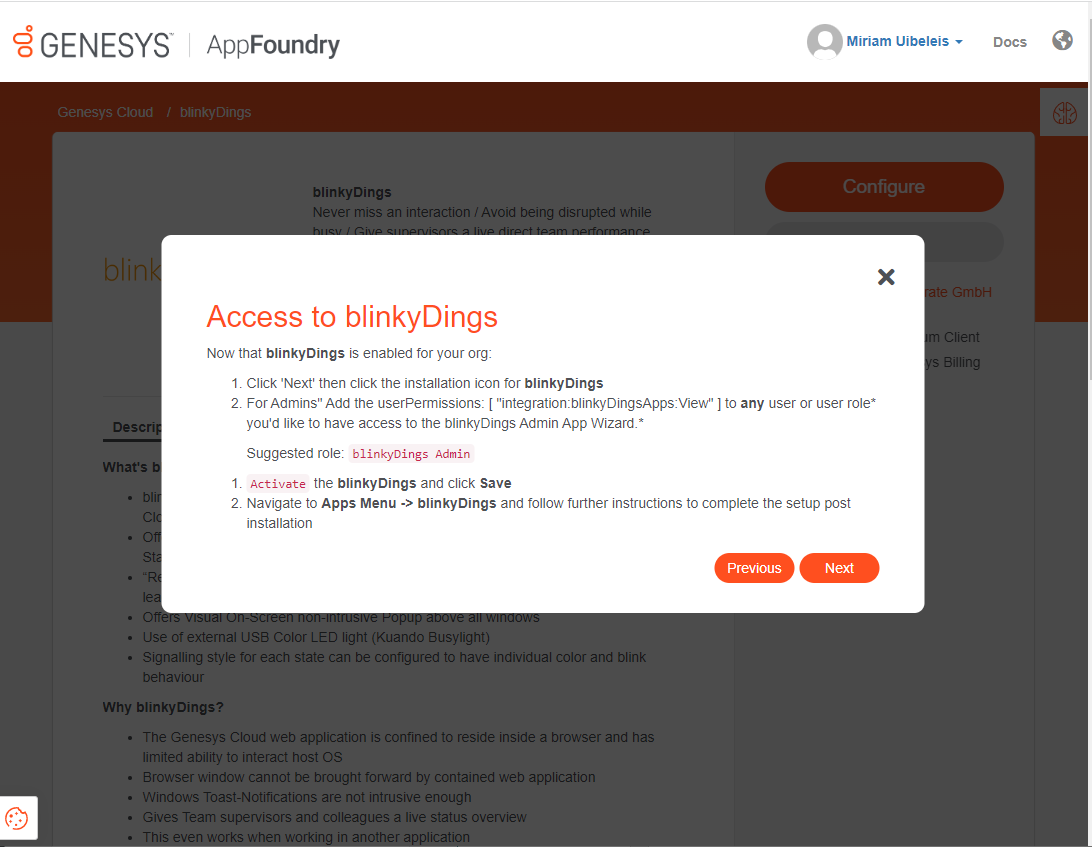
- download blinkyDings via the install icon
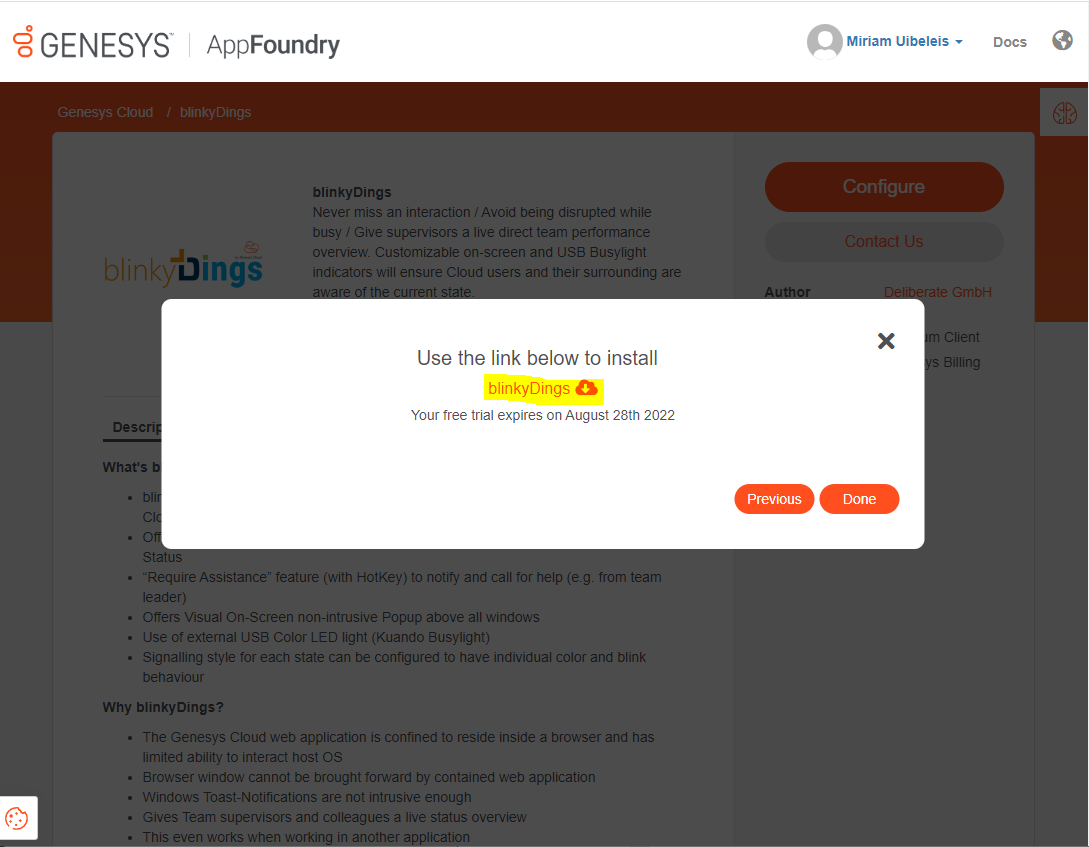
- blinkyDings Setup ausführen und die notwendigen Berechtigungen vergeben
für Admins: [ "integration:blinkyDingsAdmin:view" ]
für Agenten: [ "integration:blinkyDings:agent", "architect:datatable:search", "architect:datatable:view" and "architect:datatableRow:view" ]
- Via the Genesys Cloud CX AppWizard (login and permissions required)
- or alternatively via the Genesys AppFoundry
blinkyDings can be found in the Genesys AppFoundry. Click on Free Trial, select the offering you would like to purchase and confirm with Next, read and accept the Terms of Service, click on Activate, click Next, follow the instructions on the Post-Activation page, click Next. Also see the installation guide on top of this page.
The commercial approval from your reseller is needed, please contact them in order to have access to blinkyDings.
Follow the instructions in the installation guide on top of this page.
Yes, please contact us at software@deliberate.de. Please be advised that we highly recommend using the web installer, if possible, as blinkyDings is made up of several components that will have to be installed manually otherwise.
blinkyDings can be installed on Windows 7, 8, 10 and 11.
Yes, blinkyDings can be installed in a Citrix environment.
blinkyDings supports all Chromium based browsers such as Google Chrome (recommended) or Microsoft Edge. The automatic installation of the dingsConnector browser extension only works in Google Chrome, for all other browsers please install the extension through the Chrome Webstore and install the extension manually.
The browser you use for Genesys is closed, open the browser, and sign in with your account on the Genesys website.
Make sure your organization installed the blinkyDings integration through the Genesys AppFoundry and all permissions were assigned correctly. Also make sure you are signed into the correct organization if you have access to more than one.
If you have a local license, enter the provided license key in the configuration file. To do this, close blinkyDings(!) and go to %appdata%\Deliberate\blinkyDings. Open the cfg.json file in a text editor. You should see a line that looks like this:
“LicenseCode” : “”,
Enter the provided license code between the quotation marks on the right-hand side of that expression so it looks something like this:
“LicenseCode” : “6G8254039845H37736K936D7362736459”,
Restart blinkyDings and the License section should now read “blinkyDings license (local).
Close blinkyDings by right clicking on the icon in the system tray and clicking Exit. Go to the Google Chrome webstore in your browser, even if you are not using Google Chrome, and install the dingsConnector browser extension. Start blinkyDings.
Something went wrong during the installation process. If you used the web installer, please run it again. If you installed blinkyDings manually, make sure you installed all components. In order for blinkyDings to work you need to install the blinkyDings App, the dingsConnector local component and the dingsConnector browser extension.
Go to %appdata%\Deliberate\blinkyDings and rename the cfg.json file (e.g., cfg_old.json). Restart blinkyDings.
Sometimes it takes a little for blinkyDings to get the current information. If the error is still shown after a minute, try to click on the “Logout – Genesys Cloud” link and refresh the Genesys website by pressing F5 in the browser or clicking on the refresh icon. If that still did not resolve the issue, close blinkyDings by right clicking on the icon in the system tray and clicking on “Exit” in the context menu. Note: Just closing the window by clicking the x in the top right corner will only minimize the app, not close it.
An agent using blinkyDings and having access to all its features requires the following permissions:
- analytics:queueObservation:view
- analytics:conversationAggregate:view
- analytics:conversationDetail:view
- analytics:userObservation:view
- architect:datatable:view
- architect:datatableRow:view
- routing:queue:view
- routing:queue:join
- routing:queueMember:manage
- integration:blinkyDingsApps:Agent
An admin only needing access to the AppWizard page needs the following permissions:
- architect:datatable:view
- architect:datatableRow:view
- architect:datatable:edit
- architect:datatableRow:add
- architect:datatable:add
- routing:queue:view
- integration:blinkyDingsApps:View
Yes, admin right is required for the installation process..
The hardware is a Human Interface Device (HID), no further drivers are necessary.
See the Pricing tab on the Genesys AppFoundry page for blinkyDings to learn about current prices.
Yes, there is a 1-month free trial which starts when you first activate blinkyDings in the Genesys AppFoundry.
No, admins who only want to have access to the AppWizard page only need the integration:blinkyDingsApps:View permission for blinkyDings. This permission does not count towards usage.
Currently, blinkyDings is only available in English.
blinkyDings currently supports the Alpa and Omega models of kuando Busylights.
Yes, blinkyDings can be used together with embedded clients, such as the Salesforce client.
No, blinkyDings only works with Genesys CloudCX. We do not support Genesys Engage.
No, blinkyDings only works with Genesys CloudCX. We do not support Genesys PureConnect.
Yes, if you use the supported kuando Busylights you can configure rules that make the light play sound. Currently blinkyDings cannot play sound through the computer’s speakers.
There is an updated version of blinkyDings available, talk to your administrator or IT department.
Simply refresh the Genesys page in your browser and wait a few seconds.
There is no need to log into blinkyDings separately. Authentication is handled via Genesys automatically when blinkyDings starts.
The dingsConnector is needed to get the user token from the browser, this is essential for user authentication. This is how blinkyDings knows who is currently signed into Genesys. The dingsConnector consists of two components, the first one is the browser extension, the second one is an application on the local computer. Both components are needed for blinkyDings to work. If you install blinkyDings via the web installer and you use Google Chrome as your browser all components will be installed automatically.
In the blinkyDings window you can find a button to report a problem, the window that pops up when that button is clicked will let you enter a description of the error and when you click the Generate mail button Outlook will open and automatically attach files that will help us analyze your problem. If you do not use Outlook, you can also contact us at software@deliberate.de. In that case, please make sure to attach the log files that can be found in the following folder: %localappdata% \Deliberate\blinkyDings.
Yes absolutely, in the blinkyDings window you can find a button to report a problem, the window that pops up when that button is clicked also has an option to suggest a feature. You can also contact us at software@deliberate.de. We are always grateful for customer feedback.
This means that the Chrome extension is not enabled and must be activated manually via the browser's settings. The browser extensions page for Google Chrome can also be found at the following address: chrome://extensions/
- blinkyDings is configured via the Genesys AppWizard (login and permissions required).
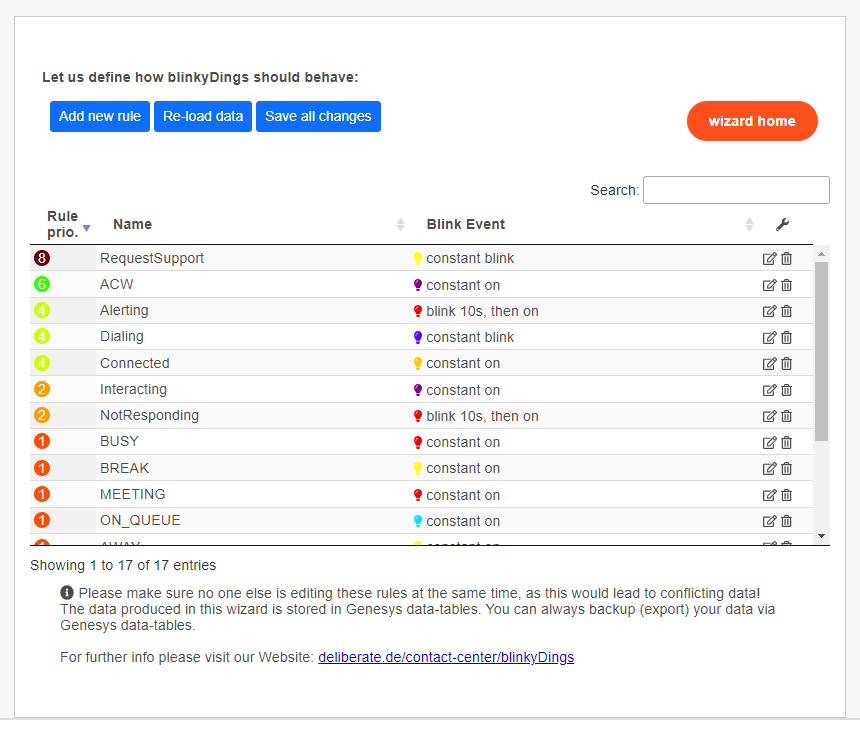
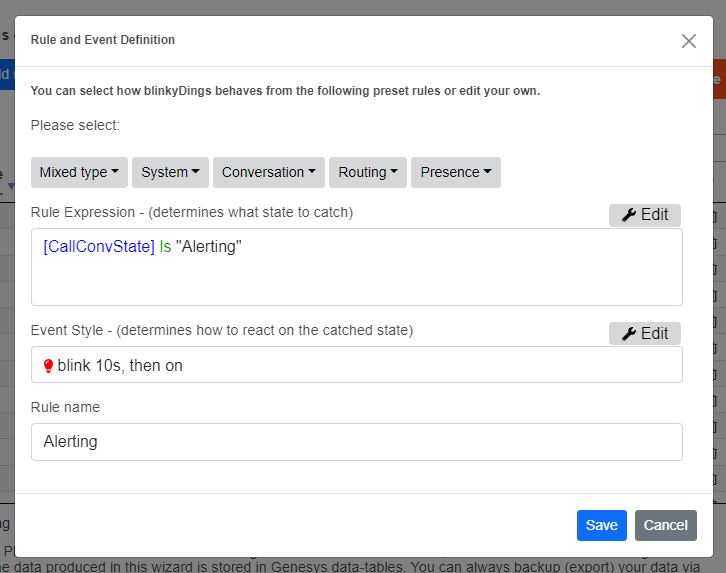

click images to enlarge
It can take up to 60 seconds for changes to take effect.
In order for the rules and the blinking behavior to be adopted, the updateRules button must be clicked if blinkyDings is already running.
The icon is not fixed by default and if he should not be visible, this must be configured in the taskbar settings.
The Alpha and Omega models from the manufacturer Plenom are supported.
Further information is available on the manufacturer's homepage.
www.plenom.com
Testing and purchase is available through the Genesys AppFoundry

as well as directly here via your Genesys Cloud CX Organization
> Admin / Integrations
These can be found here on the service page itself: Release Information
click images to enlarge


